Installing a bike rack on your car can transform your vehicle into a versatile transport tool, ready for adventure. Whether you’re a cycling enthusiast or enjoy occasional bike outings, a car bike rack offers the freedom to explore trails far from home.
This guide promises to navigate you through the various bicycle rack options and provide a detailed walkthrough for their installation. By the end of this post, you’ll be equipped with the knowledge of how to install bike rack on car, ensuring safe and easy transport of your bicycles wherever you go.
Stay tuned as we gear up to guide you through selecting and fitting the perfect bike rack for your vehicle.
Types of Bike Racks for Cars
When it comes to transporting your bicycle with your car, there are three main types of bicycle racks to consider: roof-mounted, trunk-mounted, and hitch-mounted.
- Roof-mounted racks sit atop your vehicle, offering a stable solution that doesn’t obstruct rear access but requires lifting the bicycle higher.
- Trunk-mounted racks are a more affordable and portable option, attaching to the rear of your car; however, they can hinder trunk access and visibility.
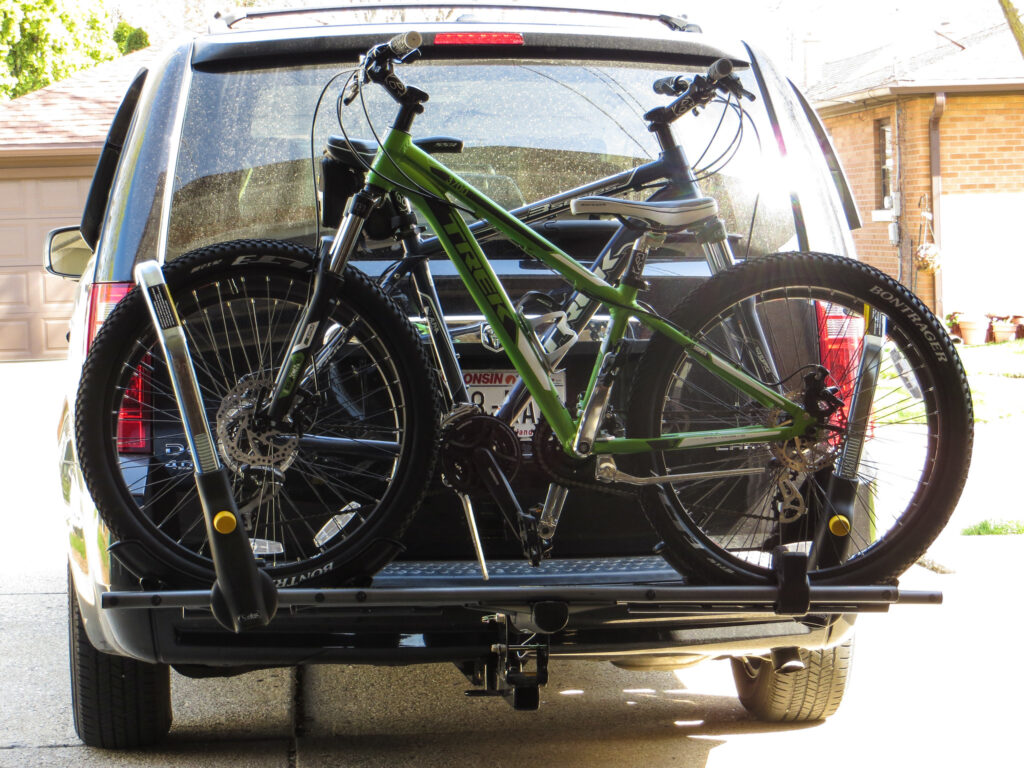
- Hitch-mounted racks connect to a hitch at the back of your vehicle, providing easy loading and excellent stability, though they can add length to your car and may require a hitch installation.
Each type offers unique advantages and potential drawbacks, tailored to different needs and vehicle types.
Choosing the Right Bike Rack
Selecting the ideal bicycle rack for your car involves a careful assessment of several factors to ensure a perfect match. Consider your vehicle’s model and make, as some racks are better suited for certain car designs.
The number of bikes you plan to transport is also crucial; opt for a rack that can accommodate your current and future needs. Budget-wise, invest in a quality rack that offers both durability and security without breaking the bank.
To guarantee compatibility, check your car’s load capacity and the rack’s specifications. Additionally, consider the ease of installation and access to your vehicle’s trunk or hatch. For a seamless fit, consult your car’s manual or manufacturer’s recommendations, and possibly opt for a custom-designed rack.
Remember, a well-chosen bicycle rack not only secures your bikes but also integrates smoothly with your car’s aesthetics and functionality.
Tools and Materials Needed
Before starting with the process of how to install a bike rack on a car, it’s essential to gather the right tools and materials to ensure a smooth process.
- Wrench Set: For tightening bolts and nuts.
- Straps: Crucial for securing the rack to your car.
- Hitch Receiver: If you’re installing a hitch-mounted rack.
- Tape Measure: For precise placement.
- Rubber Pads or Foam Strips: To protect your car’s finish.
- Screwdriver and Allen Keys: Necessary for certain racks.
Ensure you have all these items on hand before starting, as being well-prepared can make the difference between a frustrating experience and a successful installation.
How to Install Bike Rack on Car? Step-by-Step Installation Guide
Follow the below guide to find out how to install a bike rack on car:
1. How To Install a Roof-Mounted Bike Rack?
Installing a roof-mounted bicycle rack is a practical solution for cyclists looking to transport their bikes safely. Begin by cleaning your vehicle’s roof thoroughly to prevent scratches and ensure a secure fit.
Next, align the rack with the roof rails, checking the manufacturer’s specifications for proper spacing and positioning. Once aligned, tighten the clamps or use the provided mounting system to attach the rack securely to the roof rails.
It’s crucial to ensure that the rack is firmly in place to avoid any movement during transit. After the rack is mounted, lift your bicycle onto the rack and position it according to the design of the rack—some may require the front wheel to be removed, while others can secure the bike with both wheels on.
Use the straps or locking mechanisms to fasten the bike to the rack, double-checking that all points of contact are tight and the bicycle is stable. Remember to periodically inspect the rack and the bike’s attachment during your journey to prevent any accidents or damage.
By following these steps, you can confidently transport your bikes to your destination, ready for your cycling adventure.
2. How To Install a Trunk-Mounted Bike Rack?
Installing a trunk-mounted bicycle rack is a straightforward process that enhances your vehicle’s utility. Begin by positioning the rack against the trunk, ensuring the upper and lower pads rest flat against the car to prevent damage.
Next, adjust the straps following the manufacturer’s guidelines, securing them tightly to avoid slippage. The side straps should be fastened to the sides of the trunk, while the top and bottom straps should hook to the respective edges of the trunk lid.
After adjusting, gently tug on the rack to ensure it’s snugly fitted. The support arms should be parallel to the ground or slightly angled up. Place your bike onto the rack, securing it with the provided straps or cradles, and double-check that the bicycle does not obstruct your vehicle’s license plate or taillights.
Finally, perform a test drive to assess the rack’s stability; listen for any unusual noises that may indicate a need for readjustment. With these steps, your bike will be securely transported to your next adventure. Remember, regular checks during use will ensure ongoing security and stability.
3. How To Install a Hitch-Mounted Bike Rack?
Attaching a hitch-mounted bicycle rack to your vehicle is a convenient way to transport bicycles. Start by carefully sliding the rack’s shank into the vehicle’s hitch receiver; ensure it aligns properly with the hitch’s hole.
Once in place, insert the hitch pin and secure it with a clip or lock, which will prevent the rack from sliding out during transit. With the rack firmly attached, lower the arms or platform where the bikes will rest.
Lift your bikes onto the rack, positioning them in the cradles or wheel trays designed to hold them steady. Use the straps or locking mechanisms provided to fasten each bicycle individually, reducing movement and potential damage while driving.
It’s essential to check that the bikes are clear of the vehicle’s lights and license plate. Before hitting the road, give the rack a gentle shake to confirm everything is stable. Regularly inspect the hitch pin and straps throughout your journey to maintain a secure fit.
This simple installation process will have you ready to explore new trails with ease. Remember, safety is paramount, so take the time to ensure your bikes are securely mounted before each trip.
Safety Tips
Ensuring the safety of your bikes and vehicle during transit hinges on the correct installation and use of your bicycle rack. It’s vital to meticulously follow the manufacturer’s guidelines for mounting the rack to prevent any movement or damage while driving.
When loading bikes, distribute weight evenly and secure them firmly to avoid any shifts that could affect your car’s handling. Use all provided straps and, if available, padding to protect the bike frames and car’s surface.
Regularly inspect the rack’s integrity and the bikes’ stability throughout your journey, especially after driving through rough terrain or making sharp turns. This vigilance helps in averting potential accidents and maintains the longevity of your equipment.
Remember, a little precaution goes a long way in ensuring a worry-free travel experience with your beloved bikes in tow.
Maintenance and Care
Maintaining your bicycle rack regularly will ensure its longevity and performance. Begin by routinely inspecting for any signs of wear or damage, addressing issues promptly to prevent further deterioration.
Prioritize the cleanliness of your rack; remove dirt and grime build-up with a gentle, non-abrasive cleaner to avoid corrosion. Key moving components require lubrication to maintain smooth operation; use a quality lubricant designed for outdoor equipment.
When the rack is not in service, shield it from the elements by storing it in a dry, covered area. This not only preserves its condition but also maintains its functionality and safety for when it’s next needed.
Adhering to these straightforward care guidelines will contribute to a reliable and durable bicycle rack, ready to securely transport your bicycles wherever the adventure leads.
Conclusion
Learning how to install bike rack on car is a straightforward process that enhances your travel flexibility. We’ve covered the essential steps: selecting the right rack, positioning it correctly, and securing your bikes for safe transportation.
Your experiences with this installation could greatly benefit others, so we encourage you to share your insights and suggestions. Thank you for following our guide. For further exploration, we invite you to visit our collection of articles on cycling adventures and gear reviews, ensuring you’re well-equipped for your next journey.
FAQs
Potential damage to the vehicle or bikes, increased fuel consumption, and obstruction of rearview visibility.
They can fit most cars, but compatibility depends on the car’s design and the type of rack.
Choose a compatible rack, follow the manufacturer’s instructions, and secure it firmly to avoid movement.
They vary in installation difficulty; some are straightforward while others may require tools and expertise.