Putting training wheels on a bike is a crucial step in helping a child ride a bike. Learning how to put training wheels on a bike ensures that your little one can gradually build confidence and balance while experiencing the thrill of riding.
Training wheels allow learners to focus on pedaling and steering without the fear of tipping over. This crucial aid not only facilitates a smoother transition to two-wheel riding but also ensures a safer learning environment.
These supplemental wheels provide essential stability, making the learning process smoother and safer. In this comprehensive guide, we will delve into the step-by-step process of installing training wheels on a bike.
Let’s explore the necessary steps to equip your bike with training wheels and set the stage for countless adventures on two wheels.
Benefits of Training Wheels
Training wheels offer young riders a fantastic way to gain the necessary skills for biking. They provide stability, allowing novices to focus on pedaling and steering without the fear of tipping over.
This support is crucial in building the rider’s confidence, as they can concentrate on mastering the basics at their own pace. Moreover, these wheels are instrumental in preventing falls, which is essential for maintaining enthusiasm and avoiding injuries.
As children grow more comfortable, training wheels can be adjusted to encourage balance, ultimately making the move to a two-wheeled bike smoother and more intuitive.
Required Equipment and Tools
To install training wheels on a bicycle, you’ll need a few key items:
- Training wheels kit that includes brackets and hardware
- Screwdriver and pliers for any small adjustments
- Bicycle pump to inflate tires
- Wrench for tightening bolts
These tools will help you secure the training wheels firmly, making the bike ready for a learner rider. With the right equipment, setting up training wheels is a straightforward task that can be completed quickly and safely.
Choosing the Right Training Wheels
Selecting the right training wheels is crucial for a safe and effective learning experience. There are adjustable and fixed types, each catering to different skill levels. Adjustable wheels can be gradually raised to build balance, while fixed wheels provide constant support.
When choosing, ensure the wheels are compatible with the bike’s size — too large or small can affect stability. Opt for durable materials like steel or reinforced plastic for longevity. Consider wheels with rubber tires for better traction.
Proper selection ensures learners have a reliable foundation, paving the way for a smooth transition to two-wheel biking.
How to Put Training Wheels on a Bike?
Follow these steps to learn how to put on training wheels on a bike:
Prepare the Bike
Preparing a bike for training wheels is a straightforward process that begins with ensuring the bike is on a stable surface. Clear the area of any potential hazards or obstacles that could interfere with the installation.

It’s essential to check that all parts of the bike, especially the tires, are in good condition and properly inflated. This not only aids in the installation but also guarantees the safety of the rider. Inspect the bike for any damage or wear that might affect the attachment of the training wheels.
If necessary, make adjustments or repairs before proceeding. Once the bike is deemed ready, gather your tools and training wheels kit, and you’re all set to begin the installation.
Position the Bike
When positioning your bicycle for maintenance or storage, ensure it’s stable and secure to prevent any accidental damage. Start by placing it in an upright position, ideally using a bike stand that grips the frame without obstructing the wheels.
This allows for unimpeded access to both the front and rear wheels, making tasks like tire inflation or wheel removal straightforward. Additionally, positioning the bike with its wheels parallel to the wall maximizes space efficiency.
For those without a stand, flipping the bike upside down on a soft surface can protect the seat and handlebars while still providing access to the wheels.
Attach the Training Wheels
Attaching training wheels to a bike frame is a straightforward process that enhances safety for new riders. Begin by aligning the training wheels’ brackets with the bike’s rear wheel axle. Remove the axle nut on one side, and place the bracket over the axle, ensuring it’s flush against the bike frame.

Reattach the nut and tighten it securely, but avoid over-tightening to prevent damage. Repeat the process on the other side. Adjust the height of the training wheels so they’re slightly above the ground when the bike is upright, allowing for a slight tilt and balance practice.
Check all connections are tight and the wheels spin freely. Regularly inspect the training wheels for stability and wear, and adjust as needed to maintain a safe riding experience.
Adjust the Training Wheels
Adjusting the training wheels is crucial for a child’s comfort and safety. To begin, ensure the bike is on a flat surface. Loosen the bolts that secure the training wheels to the frame, but do not remove them.
Adjust the wheels so they are about 1/4 to 1/2 inch off the ground when the bike is upright. This slight elevation allows the child to develop balance while still providing support. Next, check the angle; the wheels should be parallel to the ground for stability.
Once in the correct position, tighten the bolts firmly. It’s important to regularly check the training wheels for wear and to ensure they remain tightly secured. Proper adjustment helps prevent tipping and builds the rider’s confidence, paving the way for a smooth transition to two wheels.
Check for Proper Installation
Ensuring the secure attachment of training wheels is paramount for safety. After installation, it’s wise to conduct a thorough inspection. Start by examining the bolts and nuts that fasten the wheels to the frame; they should be tightened to the manufacturer’s specifications without being overly forced.

Verify that the wheels are evenly positioned and maintain a slight distance from the ground—ideally, a quarter to a half-inch when the bike is upright—to allow for balance development.
The wheels themselves should be parallel to the ground, ensuring stability. It’s also crucial to periodically reassess the wheels for signs of loosening or wear. By taking these steps, you can be confident in the training wheels’ performance, providing a secure learning environment for new cyclists.
Tips for Using Training Wheels Effectively
Training wheels are a fantastic tool for young cyclists, providing stability as they learn. Parents should ensure they’re adjusted to just the right height, allowing the child to develop a sense of balance.
Regular practice is key; set aside time for your child to ride in a safe, open area. Supervision is crucial — not only for safety but also to offer encouragement and guidance. Gradually raise the wheels as confidence grows, which encourages independence.
Remember, patience is essential; celebrate small victories to boost their morale. With consistent support, children will soon transition to two wheels with ease and confidence.
Transitioning from Training Wheels
Transitioning from training wheels to a two-wheeled bike is a significant step for children. It’s best to start when they show interest in riding without extra support. Begin by lowering the training wheels to foster balance.
Encourage short rides without them on soft grass to cushion potential falls. Support the child’s torso to instil confidence as they pedal. Positive reinforcement is key; praise their efforts to boost morale.
Ensure the bike’s size is appropriate—neither too big nor too small. With patience and regular practice, children will gain the necessary skills and confidence to ride independently.
How to Put Training Wheels on a Bike Without Screws?
Attaching training wheels to a bike without screws can be achieved using alternative fastening methods. Start by selecting training wheels with clamp-on attachments, which securely grip the bike’s rear axle.

Ensure the clamps are tight and the wheels are level with the ground to maintain stability. For added security, use strong, adjustable straps or heavy-duty zip ties to reinforce the connection. Check the wheels regularly to confirm they’re firmly in place and adjust as needed.
This method allows for quick installation and removal, facilitating the transition to a standard two-wheeler as the child’s confidence grows. Remember, safety is paramount, so double-check all attachments before each ride.
With these steps, you can equip a bike with training wheels, ensuring a safe and enjoyable learning experience for young riders.
Conclusion
Learning how to put training wheels on a bike is a straightforward process that ensures a safe and enjoyable learning journey for young cyclists. This guide has outlined the essential steps, from selecting the right wheels to proper installation and adjustment.
With the help of this guide, parents can establish a sturdy base for their children to excel in the skill of cycling. We urge you to utilize this manual and exchange your encounters.
Your input is highly appreciated. Should you have any inquiries, we are more than willing to help. Let’s work together to make the journey smoother for every budding young cyclist.
FAQs
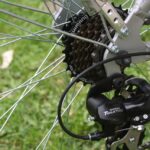
Install training wheels on a geared bike by adjusting the rear wheel and ensuring compatibility with the drivetrain.
Balance bikes can be superior as they encourage children to learn balance and steering without reliance on training wheels.
Training wheels can be added to most bikes with adjustments for frame size and wheel compatibility.
Alternatives to training wheels include balance bikes, which help develop coordination and balance before pedaling.