When it comes to maintaining your bicycle for optimal performance and comfort, knowing how to wrap bike handlebars is an essential skill for any cyclist. While it may seem like a straightforward task, there are nuances to consider that can make a significant difference in your riding experience.
Properly wrapped handlebars not only provide a comfortable grip but also enhance control and reduce fatigue during long rides. In this comprehensive guide, we will walk you through the step-by-step process of wrapping your bike handlebars.
From preparing the materials to achieving a smooth and secure finish, each step is crucial to ensure a professional-looking result. So, grab your handlebar tape and let’s get started on transforming your bike’s handlebars for a smoother, more comfortable ride.
Tools Needed
Replacing your bike’s handlebar tape calls for a specific set of tools to ensure a smooth and efficient process. First and foremost, you’ll need your chosen type of handlebar tape; options range from cushioned and shock-absorbent foam tape to durable and grippy cork or synthetic tape.

A pair of sharp scissors is essential for cutting the strap to the right length. Bar end plugs are necessary to secure the tape’s ends. Additionally, having clean cloth or alcohol wipes on hand is crucial for removing old adhesive and debris, providing a clean surface for the new strap.
For an extra secure fit, some cyclists prefer to use electrical tape to finish wrapping. Lastly, a small screwdriver may be needed to remove any existing bar end plugs. With these tools ready, you’re set to give your bike a fresh, new feel.
Choosing the Right Bar Tape
Selecting the ideal bar tape for your bicycle is a decision that impacts both comfort and control.
- Cork tape offers a classic feel with good shock absorption.
- Synthetic options provide a range of colors and patterns with reliable durability.
- Gel tape is renowned for its superior cushioning, easing the strain on hands during long rides.
- Silicone tape, though less common, delivers exceptional grip and easy maintenance.
- Leather, the premium choice, stands out for its longevity and unique patina over time.
When choosing, consider the balance between cushioning for comfort and a firm grip for safety. The right strap enhances your bike’s aesthetics and your ride’s quality, making it a personal statement of style and function.
With the right selection, you’ll enjoy improved handling and a fresh look that reflects your cycling persona.
Prepare Your Bike
Preparing your bike for a new handlebar tape begins with a meticulous cleaning of the handlebars. This crucial step ensures that any residue or grime is removed, providing a pristine surface for the new strap to adhere to.

Start by wiping down the bars with a clean cloth or alcohol wipes, paying close attention to areas where old adhesive may linger. Once the handlebars are spotless, carefully peel away the old strap, inspecting for any signs of wear or damage that could affect your ride.
With the old strap removed and the handlebars in pristine condition, you’re now ready to apply the new strap, confident that it will hold securely for countless miles of comfortable cycling.
This process not only enhances the look of your bike but also contributes to a safer and more enjoyable riding experience.
How to Wrap Bike Handlebars?
Wrapping your bike handlebars is a straightforward process that can greatly enhance your cycling experience. Not only does it provide a comfortable grip, but it also adds a personal touch to your bike. Here’s a step-by-step guide on how to wrap bar tape like a pro.
1. Start at the End of the Handlebar
Begin by cleaning your handlebars thoroughly. Starting at the end of the handlebar, peel the backing off the tape to reveal the adhesive. If your strap doesn’t have adhesive, you’ll need to use a finishing strap to secure it at the start and end of the process.
2. Secure Tape with an Anchor Point
Place the end of the tape on the inside of the handlebar end and start wrapping it over itself to create an anchor point. Make sure the tape is secure before you continue wrapping.
3. Wrap Tape Evenly and Tightly
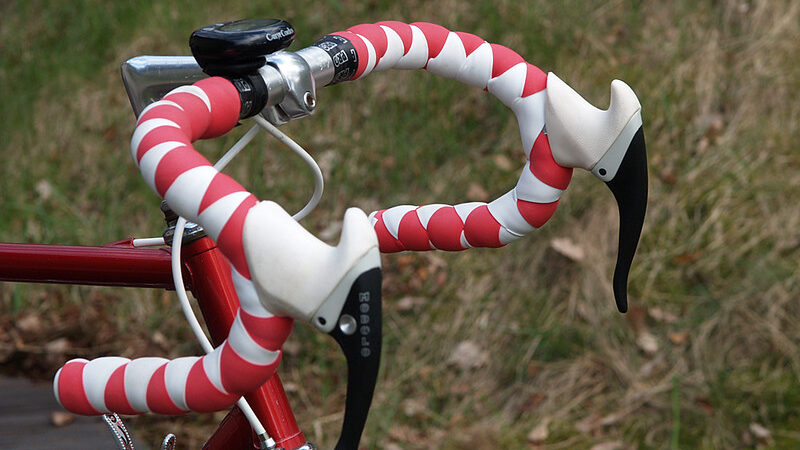
Wrap the strap around the handlebar in a clockwise direction on the right handlebar and counterclockwise on the left. This ensures that the natural motion of your hands tightens the strap rather than loosening it. Pull the strap tightly as you wrap to ensure there are no bubbles or loose areas.
4. Overlap Each Wrap Slightly
As you wrap, overlap each turn by about one-third of the tape’s width. This provides a consistent and smooth surface that enhances grip and comfort.
5. Wrap Around Brake Levers and Shifters
When you reach the brake levers and shifters, you may need to cut or fold the strap to fit neatly around these components. Some cyclists prefer to wrap a small piece of strap around the lever clamps for added security.
6. Finish at the End of the Handlebar and Secure Tape
Continue wrapping until you reach the end of the handlebars. Cut the tape at an angle to create a neat finish, and secure it with electrical or finishing tape. Make sure the end of the strap aligns with the handlebar’s edge for a clean look.
7. Install Bar End Plugs
Finally, tuck any excess tape into the end of the handlebar and firmly insert the bar end plugs. This not only secures the strap but also protects the ends of your handlebars.
These steps on how to wrap handlebars bike will not only enhance the appearance of your handlebars but also provide the comfort and control needed for your rides. Be sure to select a tape that matches your style and preferences, as they come in various materials and textures.
Wrapping Technique
Wrapping technique is essential for ensuring durability and grip comfort on handlebars. The spiral wrap method involves overlapping each turn by about half the width of the strap, creating a secure and consistent layer.

This method is particularly effective for straight sections of the bar, providing a smooth and reliable surface. For drop bars, the figure-eight wrap comes into play, adeptly covering the complex curves and angles without bunching or gaps.
This technique requires a bit more finesse, as it involves wrapping in a figure-eight pattern around the brake levers to maintain a flush and even coverage. The finishing wrap is the final touch, a crucial step that secures the tape’s end near the stem.
This is typically done with a small piece of adhesive strap, ensuring that the wrap remains intact through the rigors of riding. A well-executed wrap not only boosts the visual appeal of the bike but also significantly improves the rider’s control and comfort, making it a skill worth perfecting for any cycling enthusiast.
Maintenance and Care Tips
You’ve learned how to wrap bar tape perfectly, but knowing about proper maintenance and care can significantly extend its life and improve your riding experience. Here’s a concise guide:
- Regular Cleaning: Clean the handlebar strap after rides, especially if you’ve been sweating or riding in dirty conditions. Use a mild, bike-specific cleaner to avoid damaging the tape’s material.
- Inspection: Regularly inspect the strap for signs of wear, such as fraying or loss of cushioning and grip. These are indicators that it’s time to replace the strap.
- Replacement: When replacing the strap, ensure it’s wrapped tightly and evenly around the handlebars to prevent slipping and uneven wear. Choose a tape that suits your riding style and comfort preference.
- Storage: Store your bicycle in a dry, clean environment to prevent the strap from becoming damp and degrading prematurely. Keep away from extreme temperatures and direct sunlight.
- Protection: Consider wearing cycling gloves to reduce the wear on the strap from the oils and sweat on your hands.
Learning how to wrap bar tape perfectly is essential for every cyclist. Whether you’re a beginner or a seasoned rider, grasping the technique of how to wrap handlebar tape ensures comfort and control during your rides.
Properly taping handlebars not only improves grip but also enhances the aesthetic appeal of your bike. Start by understanding the fundamentals of how to wrap bar tape: begin at the bar end, maintain even tension, and overlap each turn neatly to avoid gaps.
Following our approach to how to wrap a handlebar ensures a smooth finish that withstands the rigors of cycling.
Conclusion
Wrapping bike handlebars effectively enhances comfort and control, a crucial aspect of cycling. This detailed guide on how to wrap bike handlebars outlined the essential steps, ensuring you can achieve a professional finish with ease.
Regular maintenance not only preserves the wrap’s integrity but also ensures safety during rides. By taking on this task, cyclists can personalize their bikes, achieving a unique aesthetic and superior grip.
Now, it’s your turn to apply these insights and elevate your cycling experience. With patience and precision, your handlebars will not only look great but also offer improved performance.
FAQs
To wrap road bike handlebars, start at the bar end, wrap clockwise on the right, counterclockwise on the left, and finish near the stem.
Typically, mountain bikes don’t require wrapping; instead, use grip shifters or lock-on grips for handlebar control.
Yes, double wrapping bike handlebars add cushioning and comfort, especially for long rides.
Not recommended as adhesives weaken and material stretches, compromising grip and aesthetics.


